Hire a good detailer to polish it for you if you do not feel comfortable doing it or do not want to invest the time and money.
You can do it yourself if you want to invest in some products. The Porter Cable 7424XP will only run you around $100 and being and random orbital buffer it is very safe. Dont think of your old "wax spreaders" (the buffers with big pads that you hold one both sides and they just jiggle). There are other versions of random orbit ones from Meguiars, Griots Garage and Rupes. Here is a picture and a link to one place where you can buy the PC. I'll just list their site for links to products, there are other places as well, you can shop around if you would like, but to keep it simple I'll list everything from the same place.
Porter Cable 7424XP
Wax Spreader
(Arm jiggler
)

Another popular alternative to the random orbital polishers is the Cyclo dual head polisher. Both heads are random orbit heads, and these machines have been used for decades.
Cyclo Polisher
If you want a little more speed and cutting ability than the above, you can go to a forced rotation dual action polisher like the Flex 3401. It requires a bit more caution as the pad is always rotating versus a random orbit polisher where the pad will stock rotating when too much pressure is applied. The 3401 gives you fast cutting and finishes nicely though and is safer than a rotary. The 3401 is pricey though. Flex power tools are made in Germany and are very high quality, like anything though you will pay for it. Unless you like nice tools, or plan on doing a lot of polishing, you may want to start with the 7424xp. The 7424xp will always have a use even if you add a Flex later. If you do get the 3401 I suggest getting the HD model with 25' cord and the interchangeable backing plate system.
Flex XC 3401 VRG HD Polisher

For the fastest cutting and easiest removal of sanding marks, scratches and deep swirls, a rotary is the best choice. However a rotary is dangerous if not used correctly as it will burn the paint and can remove too much paint if caution is not used. Many companies make rotary polishers, Flex, Metabo, Fein, Festool, Walter, Bosch, DeWalt, Milwaukee, 3M, Makita, and the list goes on. A few of the most popular ones are the Flex PE14-2-150, Flex 3403, Dewalt 849X, and the Makita 9227C. Now if you just want to do a tractor or two, you can go pick up the Harbor Freight model as well, but they do not last very long and their electronics leave enough to be desired. Still many people have good success with them for what they cost and for what their usage is.
Here are some of the popular ones.
Flex PE14-2-150 Makita 9227C
 DeWalt DWP849X
Out of the polishers listed above, personally I have a Flex PE14-2-150 rotary and Flex XC 3401 VRG HD for polishing paint as well as a DeWalt DWP849X that is strictly used for polishing aluminum/stainless as it is a very dirty gritty job and I would not want that type of contamination around paint. The DeWalt works much better for the metal polishing due to higher speed, and a little more power. The vent screens are nice too as the wheels shed quite a bit polishing metal. The Flex is lighter and smoother though.
Now you are obviously going to need some buffing pads for these tools as well. There are tons and tons of options out there. Personally I haven't ventured out to try a lot of different ones, but currently use Lake Country CCS pads as well as their MicroFiber pads. I am trying their Hydrotech pads now. For heavy cutting wool pads I use TufBuf black natural lambswool pads. A wool pad in general is going to be used for your heaviest cutting. There are some finishing wool pads out there so make sure you know what you are getting, but for the most part they are ment for heavy compounding. Compounding is the term used for using a compound on the paint. Its the first step after wet sanding if applicable. A compound contains agressive abrasives but generally does not finish to a high luster and requires a second procedure afterwards. A polish has much less cut than a compound and leaves a deep gloss ready for a sealant. One step products have a cut that is in between a heavy compound and light polish and they finish out a little bit less than a high luster polish. Foam pads are very popular, there are different color pads with different cuts, but every manufacturer is different so pay attention to their color coding. Microfiber pads are a newer product but work well. Below is a link to a lot of Lake Countries products as well as a link to the TufBuf pads. Make sure you clean your pad after every section
(2'x2'
). Clean wool pads with a spur, foam pads with a terry towel with the polisher running, and microfiber pads with compressed air. You can wash your foam and MF pads in the washing machine when done, let them air dry or dry in machine on very low setting. You can also wash them in the sink, then spin them dry with a rotary and let them air dry.
Lake Country Pads TufBuf Wool Pad Now that you have polishers and pads you need compounds and polishes. I personally use Menzerna products, however they are a little more money than some other products and you will not find them locally as easily. THey are a German product and are not as known as 3M or Meguiars and such. You wont find most of the stuff listed in my post locally really unless you have a body shop/detailing supply house close by. 3M is easiest for a lot of people to find. Meguiars is liked by many but their professional line can be harder to locate. For Meguiars OTC products, Ultimate Compound and polish are great products. The list of compounds and polishes out there is endless. Remember to always use the least agressive approach to save your paint/clear coat. Most manufacturers have a list of their pads from agressive to least agressive as do the manufacturers of the compounds and polishes. Its important with Dimishing Abrasive polishes to work the product enough and to not use too much product. If you use too much, you will not get any cutting action. If you do not work the product long enough, the abrasives do not do their entire job properly. Generally 6 passes is enough, alternate directions each time. Less is more, just make sure you are not dry buffing. Some compounds will dry out while you are working with them, you can spray them with a bit of water to relube the surface. Below is a chart of the Menzerna products and link to them. Again, there are many many other brands out there. Once you have chosen the products needed to get the paint polished, then you will want to protect it. A good sealant is reccomended. I like Menzerna Power Lock, many others who use other brand polishes also like this sealant. There are other sealants out there though. These types of sealants are good for 6 months or so and much more durable than a wax. If you wish, you can top the sealant with a wax. This is called "Topping". You can apply multiple coats of sealant and wax just make sure to read the label as there are minimum cure times. Remember some waxes need to dry to a haze and others need to be buffed off wet so read the label. Also remember, wax does not give your paint its shine, the polishing you do leading up to the wax application is what gives you paint its shine. A high quality wax will add depth and luster, but it will only be as good as the steps you tool leading up to that point. Waxes and sealants are referred to as LSP's
(Last Step Products
) and many people go a little nuts over them. Not shown in the Menzerna chart below is their Glaze, Power Lock Sealant or their Color Lock carnauba wax. Glaze is used in body shops and on some show cars. In a body shop, production speed is important, many times they will compound out the sanding marks and this will leave some holograms or buffer trails. Taking the time to go through a polish the paint to a sheen is not always considered necessary and many choose a glaze product. Glazes simply fill in the tiny scratches to leave a nice looking sheen, making the car ready for the customer. However after a few washes the glaze will go away. This is an accepted practice though and most people do not notice the buffer trails anyways. Many people use glaze to add a little depth to their paint before a show as well. Using a DA to apply wax insures and thin even layer. Menzerna top inspection is also not shown below. This product is used to "strip" the paint after you are done polishing. You can also use a 12% Isopropyl Alcohol mix as well. Stripping the paint gets all of the left over compounds and oils out of the micro scratches and will show you if you missed anything. It will also promote better adhesion for the sealant.
Menzerna Polishing Compounds
In order to prevent instilling more swirls than you remove from the paint, you will need some high quality Micro Fiber towels. You will need to be wiping off the compounds and polishes throughout the buffing process as well as the sealant and wax. You will use MF towels for all of your various detailing needs. Keep ones used for dirty areas
(wheels, engines, etc
) seperate from your paint safe towels. Never dry on high heat, and if you choose you can use an MF detergent. Many places get a pretty penny for their MF towels so I get mine from the link below. You want a high gsm for quick detail sprays and waterless washes, and a tight closed loop nap with less gsm for removing compounds and polishes. Play around with different styles yo see which suits you best.
Microfiber Towels Now before you do any polishing or compounding, its important you get everything cleaned. Obviously the first things you want to do is wash your tractor/vehicle with a high quality wash and wash mitt. Its best to use a two bucket method where one bucket is used as the rinse bucket and the other has your car wash in it. You can also add grit gaurds to the bottom to prevent grit from being transferred back to the paint and creating scratches. You can either blow dry or dry with waffle weave MF towels. Its best to blot dry versus wiping. If the vehicle is not terribly dirty you can use a waterless wash, or rinseless wash. I use Mr. Pink for my regular wash, I also have their Hose Free ECOwash, Optimum No Rinse is another good rinseless wash and for a complete waterless wash, Ultima makes a good product.
Mr. PinkOptimum No RinseUltima Waterless Wash PlusOnce clean and dry you will want to remove any tar in the paint. I use TarX from car pro for this. You may also choose to remove iron from the wheels or paint. I use IronX for this, it smells terrible though. If you wish, you can also use TRIX which combines both tar and iron removal into one. You would be surprised what is embedded in your paint.
TarXIronXTRIX Once finished with those products, put a plastic sandwich bag on your hand a feel the paint. If it feels rough and gritty, you'll want to run a clar bar across it. To clay the paint, you just spray on some clay lube, knead the clay into a flat disc and rub it against the paint until you feel the contaminants are removed. Then wipe off the excess lube and continue to a new section. Knead the clay as it becomes dirty.
Clay Bar Products Once those steps are done, you can begin testing which products to use for the paint correction process.
For some helpful videos on any of these processes, check out this YouTube channel.
Autogeek They also have a forum that is quite friendly and helpful with no beacon or BTO comments filling up threads.
Autogeek Forum Now all of the above may seem very excessive to you and thats okay. To many people its way to much work. However it is like anything else, you get out of it what you put into it. If you skimp in the early stages, the final result suffers. However everyones expectations of a final result are different. If you want it to look good from the road, you could skip most of the processes. It's all up to you. You can also pay a detailer to do it for you, if you have two tractors and have little interest in doing the work yourself it'll be much cheaper to pay them. To completely detail a tractor takes a very strong day, sometimes two days if it is just one person. That is figuring on it being like most tractors with a dirty stained cab, leaky hydraulics, and faded paint. The paint correction alone can take the better part of the day. To me its a fun relaxing hobby, to many its just extra work. I'll admit, its a bit depressing if you stop and think about it, because you know that now that you detailed it, the next guy in it is going to go drive with the window open and scrape it against tree branches while driving through a mud hole, but it does keep them looking nicer in the long run.
Don't forget the air freshener. All of the guys around here like this one, however I have 6 or 7 other flavors I alternate it with as it does get old after awhile.
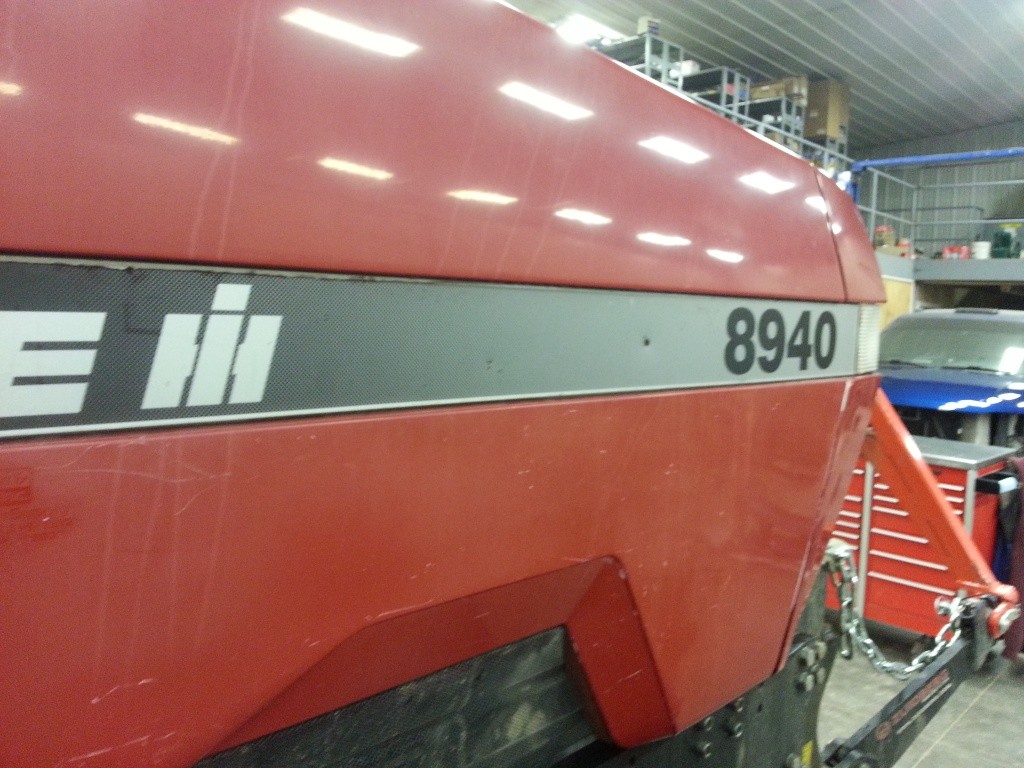
Stripper Scent I've attached a before and after photo to show you some of the results you can get. It's not a very good one, but it's what I can find on my computer right now.
Good luck.
 Waxing equipment ?